The Process of Sealcoating Asphalt

Sealcoating is an important maintenance activity that keeps your commercial property’s asphalt looking new. However, the process involves more than just slapping tar on a driveway or parking lot.

Sealcoating

Suitable materials and application methods are required to ensure success. A key ingredient is water, which satisfies the water demand of fillers/aggregate and additives and allows for fluidity for easy handling, application, and storage. To learn more, visit https://www.rochesternysealcoating.com/.

Sealcoating protects asphalt from oil, gasoline, and chemical substances that can soften and degrade the pavement. It helps the surface remain flexible to pressure from vehicles instead of cracking under the stress, and it saves money in the long run because it extends the life of a paved surface and reduces or eliminates the need for costly repairs.

To get the most benefit from your asphalt, you should sealcoat every few years. Before sealcoating, you need to prepare the surface of your parking lot. This includes getting rid of any debris, and washing away any fertilizers, chalk, or oil stains that may be on the surface. It’s important to do this a few days before the sealcoating process, so that it has time to dry.

You’ll also need to make arrangements with any customers or suppliers who use your parking lot so that they know it will be inaccessible during the sealcoating process. They’ll need to reschedule deliveries or arrange for a different drop-off point, and you’ll need to put up signs warning people not to park there. If you have sprinklers in your parking lot, turn them off for the day of the sealcoating.

There are a number of different ingredients that go into a sealcoat, but the most important is the binder. This is what binds the other ingredients together and gives it a rich black color. Coal tar is the most common binder, but other petroleum-based products can be used. Some additives are included in the mix to help with drying, altering sand suspension, improving water repellency, and adding resistance to salts and petrochemicals.

The other main ingredient is the fillers/aggregate, which gives the sealcoat its texture. It’s also responsible for the black, glossy appearance that it has. A good mix will have a variety of aggregates to ensure that the sealcoat has an even, dense application. The cover aggregate also adds traction to the surface, which can help reduce the risk of skidding and other accidents. The aggregate also adds strength and durability to the coating, making it less likely to peel or crack.

Application

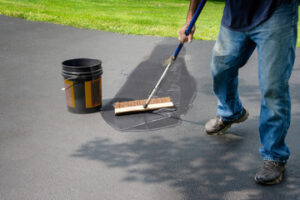
Asphalt sealcoating is a messy business. It should never be attempted by a homeowner, and it should be done by experienced, professional asphalt contractors only. The materials are hazardous, and there is much work involved in applying it correctly. It is best to have a contractor take care of this for you, especially if you have a large commercial parking lot or driveway to cover.

The application process includes power washing the pavement surface, and treating any oil spots or oxidized areas with an appropriate product. Then the surface must be allowed to dry completely. The contractor will use a crack filler to treat any visible cracks in the pavement, which will also need to be fully cured before sealcoating is applied.

Once the preparation is complete, the contractor will apply the seal coat with a sprayer or squeegee. It is important that the coating be evenly applied, and that it is not allowed to run off onto curbs, sidewalks or grass areas. Sealcoating will stain these surfaces if it is not adequately contained.

There are several different types of seal coating products, and the type used will be dependent on the needs of each particular paved surface. One popular choice is a coal-tar product, and it contains TR-12, which is refined coal tar usually produced from bituminous coke in the production of iron or steel. Coal tar is a good alternative to other petroleum-based products because it is a much more stable material that will not degrade from exposure to the elements, sun or chemical penetration.

Another popular choice is an asphalt sealer that does not contain coal tar, but it still uses petroleum-based ingredients to provide a durable coating for the asphalt surface. These product formulations use high levels of polycyclic aromatic hydrocarbons that can be harmful if they are inhaled or ingested by people, pets or wildlife. It is best to avoid these products if you can, as they are known to be carcinogenic and can cause other health problems as well. Regardless of the type of seal coating product you choose, it is always a good idea to follow the manufacturer’s instructions for application and curing.

Curing

Sealcoatings, like all water-based coatings, attain full cure through the loss of all moisture from the wet film. As the water leaves, the wet film shrinks in volume and tightens to become an impervious, tough coating. The first 80-90% of the moisture leaves rapidly; however, it takes time for the last 15-20% of the water to leave the film. This slow release of moisture is one reason why we recommend allowing your newly sealcoated surface to dry for a minimum of 24 hours, even though it will be safe to walk on much sooner.

Sealcoat drying and curing is greatly accelerated during hot, sunny summer days, but even these warm weather conditions must be carefully monitored to ensure that the process of water evaporation does not cause damage before the sealcoating has time to fully cure. For this reason, it is recommended that sealcoating be applied only on a day where the forecast calls for a high temperature with no rain.

The ideal temperatures required for a proper sealcoat cure are between 50° and 85° Fahrenheit. Sealcoat applied at colder temperatures can “fog”, which immobilizes binder particles and prevents them from properly fusing to the pavement to form a continuous film that envelops the clay and filler particles of the asphalt to create a durable, hard wearing surface. Sealcoat cured under such conditions typically turns grey and blotchy in appearance and never returns to its characteristic dark slate black appearance.

Humidity is another important factor in sealcoat drying and curing. It can take twice as long for sealcoating to dry and cure when the air is humid, compared to a non-humid environment. The proper humidity level for your area can be determined by checking the local weather report or calling your local forecasting service.

Once the sealcoating has cured, it is then swept and broom finished to remove all loose gravel. This final step helps to eliminate any unsightly blemishes from the newly cured surface and also improves traction, making the newly paved surface safer for vehicles to drive on. At this point, the paving is ready for regular use as long as traffic is kept to a minimum to allow the new sealcoating to thoroughly set up and mature.

Maintenance

Sealcoating is a preventive measure that protects your asphalt from the elements. It can reduce the amount of oil that is lost from the paved surface and helps to keep water, salt, and chemicals from damaging the pavement. It can also extend the life of your asphalt and add value to your property.

Sealcoat consists of refined coal tar pitch, (a byproduct of steel production) or asphalt cement, which is a byproduct of the petroleum-refining process, mixed with inert fillers, water, and emulsifying agents. It is applied in thin coats to the pavement. The mixture is heated to melting point so it can penetrate the cracks and re-bond the surface. Once it has cooled, it will provide a protective coating that will extend the life of the surface.

It is important to follow all manufacturer’s instructions and hire professional sealcoating contractors to ensure a quality application of the product. It is also critical to schedule regular inspections to catch any potential problems before they become severe.

Ideally, sealcoating should be done in dry weather. Rain will destroy the finished result and should be avoided at all costs. A paving contractor will be able to tell you the best time of year to perform your sealcoating depending on where you live.

The area to be sealed must be blocked off and all vehicles must be removed prior to the process being started. Sprinkler systems should be turned off and remain off for a full 24 hours to avoid getting the newly-applied sealcoat wet. Barricades and warning tape should be used to help block off the work area.

When the job is complete, the area should be reopened to traffic as soon as possible. Any vehicles or pedestrians that enter the area before the sealcoating has had a chance to dry will dislodge or remove the new layer and cause damage. It is recommended that you use traffic cones and barricades to deter people from entering the area until the sealcoating has had a chance for proper curing.

Once the sealcoat has had a chance to cure, it is important to sweep and blow the surface. Any rock or debris that is blown off of the asphalt must be properly disposed of. Otherwise, it can get swept into landscaping equipment and end up in the path of people driving by. This is an easy maintenance step that will make your asphalt last longer and save you money in the long run.

Choosing Water Heaters That Are Energy Efficient

Water Heaters Denver CO are one of the largest appliances in a home. They are often located in a basement, utility closet, or garage. Electric models heat water using electricity and store thermal energy for later use. They are the cheapest and easiest to install in homes.

Water Heaters

The short tank design makes this model ideal for tight spaces, and fits easily into a utility closet. Reviewers appreciate the electronic gas valve and LED status indicator.

Whether it is gas or electric, a water heater consumes lots of energy to operate. Hot water heating is on average the second highest household energy expense, and it takes up to 18% of a home’s energy bill. This makes choosing the right water heater an important decision for consumers who want to reduce their energy consumption and carbon emissions.

ENERGY STAR water heaters are among the most efficient, using less energy than other models to meet your household’s hot water demands. To compare the efficiency of different models, look for a yellow Energy Guide label with standardized information about their energy use and estimated annual operating costs. To find the best ENERGY STAR model, choose one with a high uniform energy factor (UEF), which indicates how efficiently it performs compared to other similar models.

An electricity-powered water heater has the benefit of being able to be powered by renewable energy sources, which makes it a good choice for consumers who want to make an environmentally conscious choice. Gas water heaters, on the other hand, are not as good for the environment because they require natural gas which is retrieved from the earth in a process that releases greenhouse gases.

The combustion and ventilation processes that power a gas water heater also waste energy by allowing heat to escape from the system. In contrast, an electric water heater has no need for ventilation. This allows it to heat up faster, and the heat stays inside the tank instead of being wasted through the vent.

If you have an electric water heater, your utility company may offer rebates or other incentives for switching to a more efficient model. You can check for these offers online, or by calling your local utilities.

Consumers can also save money by installing a heat pump water heater, which uses about half as much energy as a standard gas or electric water heater. These units draw energy from the air, and are a good option for people with existing electric heating systems or who live in climates that do not support traditional fuel-based heat pumps.

Tank Size

Choosing the right water heater size is important. A tank that’s too small can run out of hot water quickly and be more expensive than one that’s larger because it will consume more energy keeping up with demands on an ongoing basis.

Traditional storage tanks are sized based on BTU input and capacity in gallons, but you can find out more about the best tank size for your household by looking at a unit’s first hour rating (FHR). This rating lets you know how many gallons of hot water it can supply during peak usage. A family of four, for example, might shower and wash laundry all within an hour, using up to 100 gallons or more. So a 40-gallon tank, like this A. O. Smith ProLine Power Vent Gas Water Heater available at SupplyHouse, would be a good choice.

To determine your FHR, simply count how many people are in your household and then multiply it by 12. You can also estimate the amount of hot water you use on a daily basis by adding up the number of showers and loads of laundry you take each day. This will give you a general idea of the capacity you need, but it’s best to get an accurate number by counting your usage over the course of a week.

This budget gas model has a 40-gallon tank capable of producing 68 gallons during the first hour of use, making it a great option for households of three to four people. It also features a digital gas valve for easy temperature adjustments and a vacation mode that saves energy when the house is empty. Reviewers say it’s compact enough to fit in utility closets and installs easily.

This electric tankless water heater has a high energy efficiency rating, so it’s more environmentally friendly than other models. It’s also more affordable and has a longer warranty than other models, which makes it a smart purchase for any household. It also has a shut-off valve that immediately stops the flow of water when it detects a leak, iCOMM smart connectivity that allows you to control your water heater remotely via WiFi, two 5,500-watt quality stainless steel heating elements that provide fast recovery times and a low maintenance cost, and a glass-lined tank that protects against corrosion.

Safety

Water heaters are usually tucked away in some corner of your home and seldom considered unless there is a problem. However, they can be dangerous if not properly maintained and vented. This is especially true with gas-fueled water heaters which can leak carbon monoxide into your home. Carbon monoxide poisoning is a silent killer that can cause headache, weakness, dizziness, nausea, chest pain and confusion in people and pets. It is particularly dangerous for children and seniors.

A gas-fueled water heater is also a fire hazard. That is why you should never store combustible items near the unit such as paint, jump ropes, trash, canisters of gasoline, or coats or other clothing. All it takes is one spark to ignite the flammable materials and start an explosion. Gasoline fumes are also a hazard to have near a hot water heater because they can seep out of the vent. That is why we suggest that you keep your gas water heater elevated on a pedestal, which will help the fumes stay low and out of reach from combustible items.

Ventilation is also important for a gas-powered water heater. If there is a lack of ventilation the water heater can leak carbon monoxide into the home. It is important that you have all your gas appliances, including your water heater, serviced by a professional to make sure they are properly vented. Also, you should install carbon monoxide detectors in your home if you have a gas water heater to alert you of a CO leak.

An incorrectly installed pressure/temperature relief valve can cause a tank to explode. It is crucial that you have a licensed plumber install this valve correctly. The valve is designed to open when the temperature and pressure rise too high, preventing your water heater from bursting and damaging your home. It is a good idea to test your water heater’s valve once a year by pulling on the handle and making sure it moves easily with no leaks. If the valve is faulty, it needs to be replaced immediately. The water line from the top of the tank to the hot water service pipe should also be checked to make sure it is not leaking and that the valve on the bottom is working correctly (it should open when you pull up on the handle). If it does not, the valve needs replacement.

Maintenance

Out of sight, out of mind: that’s how most homeowners view their water heater. But that’s a dangerous way to treat such an important appliance. Unless you’re constantly keeping an eye on your water heater, minor issues can fly under the radar and turn into major problems – leaving you with a flooded utility closet. That’s why it’s essential to conduct a quick inspection once a month.

First, shut off incoming water flow using the tank’s water shutoff valve (or the breaker to a gas or electric unit). Then, drain the tank and rinse out the sediment chamber. This will help extend the life of your hot water heater and reduce energy costs by lowering energy usage.

All gas and some electric water heaters come equipped with a temperature and pressure relief valve. This safety device is designed to open if the internal temperature or pressure exceeds benchmarks set by your manufacturer. To test this, place a bucket below the discharge pipe and lift the lever on the pressure-relief valve. A limited pool of water and hot water should spill out, indicating the valve is functioning properly.

A corroded anode rod may be a sign that it’s time for a replacement. Your anode rod attracts corrosive materials that would otherwise shorten the life of your water heater, but as it degrades it becomes less effective at doing so. Check the anode rod’s core steel wire: if more than half of it has been exposed, it’s time to invest in a new one.

It’s also a good idea to drain and flush your water heater once every three to five years. This will prevent sediment buildup, which is a leading cause of rusty water. Draining the tank requires a large container to catch all of the sediment, a garden hose and, for gas units, a propane tank or a natural gas adapter.

For a tankless water heater, follow your manufacturer’s instructions for locating and draining the filter. It’s usually screwed into a port on the side of the water heater. You’ll likely hear a gurgling sound during the draining process; this is air entering the system as water exits the tank.

Roofing Replacement – Roof Shingles Decking or Shingle Roof?

roofing replacement

The process of roofing replacement differs depending on the materials to be replaced and how the old roof is being replaced. In the case of replacing a roof with aluminum or tin tiles, all that needs to be done is to cut away the old underlayment and remove the tiles. Now the area is ready for installation of the new Roofing The flashing is done last. This entire process usually takes two days, but it can vary according to the roofing replacement contractor’s expertise and the complexity of the task.

If the roof replacement project requires a complete roof replacement, it can take anywhere from one to three days for completion, depending on the roofing replacement contractor’s experience and the complexity of the job. It would be wise to have a contract with a roofing replacement company specifying the time frame for completion. When this contract is signed, the roofing replacement company will ensure timely completion of the work, as per the contract. There are different ways to avoid delays in a roof replacement project.

* When a roofing replacement project involves a complex installation, it is advisable to have at least three people to watch the work. This is because while one person is working on one part of the job, another person has to check the other parts of the underlayment for signs of leakage. * Another way to save time is to make certain that a leaky pipe is fixed before starting work. * It is advisable to have at least two people working on the roof installation at the same time so that one can help where the other is needful.

Before beginning work on a roof replacement project, it is always a good idea to check for any signs of water damage. This can be done using a wet/dry gauge, and when it is found, repair immediately. Falling debris should also be identified and repaired right away. It is not a good idea to wait for the falling debris to be removed. As mentioned earlier, this is not only dangerous but also expensive. If you catch the falling debris in time, you can prevent further damage and save some money.

The next step in replacing roofs is identifying the right roofing contractor. When looking for a reliable roofing contractor, it is a good idea to ask for references. A reputable contractor would provide at least three such references and also offer a free estimate for the entire replacement process. This could be a huge help for the homeowner, who would otherwise have to pay a lot more money.

When installing asphalt shingles, it is a good idea to have a friend or family member to help you. This is because you do not want the asphalt shingles to blow away when replacing the roof. One of the best things about installing asphalt shingles is that they are very durable and last longer than other roofing material such as slate. This fact makes them a better choice for homeowners who want to replace their roof without having to spend too much time and effort on the project.

Finally, it is a good idea to work with a licensed roofing contractor. It is important that you work with someone who is well-experienced and has a good reputation in the industry. While hiring a roof replacement contractor may seem like an expense, it is actually a great investment as they would be able to guide you throughout the installation process.

Some of the tools you will need during the roofing installation process include nailers, nippers, tarps, felt paper, stakes, and roofing material. You can also rent some of these tools from a hardware store. If you don’t want to spend money on buying all these materials, you can always go for the do-it-yourself kit that includes all the necessary materials for a roofing repair or remodeling project. However, if you think that a roofing job is beyond your level of expertise, then it is a good idea to get a roofing contractor to do the job. And remember that hiring a roofing contractor is a better option than spending more money on a new roof.